Tuesday, 23 November 2010

Papertake Weekly - Cut it out!


Happy Tuesday everyone! It's time for a new Papertake Weekly challenge, and this week it's "Cut it Out". So you can use your punches, die cuts, or just cut your image out with your scissors! We're being sponsored this week by the fabulous Wendy over at Digital Delights by Louby Loo! I chose to use this absolutely adorable penguin from Kraftin Kimmie called Oliver! I fell head over heels in love with this little guy as soon as I saw him last year and had to have him. Well it just so happens that Kimmie sent me another Oliver stamp in my Guest Design Team package, so some lucky person out there is getting ready to win him! All you have to do is leave a comment on this post before 11:59pm Friday night, November 26th, and I'll pull a lucky winner sometime next weekend!


Oliver is colored with Copic markers and then cut out and popped up for dimension. The hearts were cut from Nesties and the icicle punched border is from  a Martha Stewart punch. The sentiment is computer generated. I used Bazzill cardstock for the base, Kraft cardstock for matting, and the PP is from Nitwit Collections. The red pearls are Kaiser and the ribbon is May Arts. That's it for me today! Please be sure and pop over to Papertake Weekly to see what the rest of the fabulous designers created for your viewing pleasure. And then grab your paper and glue and join us in the challenge! Thanks for stopping by to see me today, and for those of you that are in the States, I wish you and yours a Very Happy Thanksgiving! Hugs! Don't forget to leave a comment for a chance to win Oliver!

Saturday, 13 November 2010

Embossed Christmas Trees With SP & Co. Stamps


Yeah, it's the weekend!!  I love the weekend - there should be fewer weekdays and more week end days!  Can any of you arrange that?

Last week I posted my first two cards made with Samantha's, SP and Company, Christmas Tree stamp set.  I mentioned that I had stamped the trees on pink textured cardstock and embossed the print.  This is the card I made with those embossed trees.


I used embossing ink and burgundy embossing powder to create these four trees.  Each stamp was loaded with embossing ink, then stamped onto the pink cardstock.  Burgundy embossing powder (from PK Glitz - formerly the Powder Keg) was applied over the ink and heated with a heat embossing gun.   The effect created with the hand mixed embossing powders is a medium thick embossing with touches of sparkle mixed in the color. 

Using micro tipped scissors I cut out each tree and saved them along with a 6 x 6 square of the pink cardstock.  Last weekend I pulled out the set aside elements and created this card.

Using the Spellbinder's Wizard and Nestie Label #1, the label shape was cut out of the middle of the pink cardstock, creating a label shaped void - and a perfect spot to layer and pop the trees!  The pink cardstock was then trimmed to fit on the front of the burgundy card.

Using assorted sized half pearl embellishments and holographic peel offs, the trees were decorated prior to being layered and attached to the card front.  A Season's Greeting peel off sentiment was added to the front of the card along with half pearls in the corners of the pink cardstock.  Finally holographic peel offs were added to frame the front of the card. 


I have enjoyed using the SP and Company stamps and will be making at least one more Christmas card using this set in the next couple of weeks.  I will be back tomorrow and start another week of Thanksgiving themed projects.

Thursday, 4 November 2010

Twas the Night Before Christmas - A new release and challenge


There's a new release over at Digital Delights by Louby Loo today,  along with a new challenge at Delightful Challenges which is Stitching - real or faux.   I used this cute image Christmas Morning Pippin and he's colored with Copic markers. Cardstock is Bazzill, PP is from Nitwits, and the scroll was cut using my Cricut Expression and Christmas Cheer cartridge from Hallmark Scrapbook. That gorgeous ribbon is from Stamp and Create, and that cute mouse charm is from Bunny Zoe's Crafts.


Please be sure and pop over to Delightful Challenges and take a peek at all the fabulous creations by the rest of the design team! Thanks for stopping by to see me today, and hope to see you back again soon. Hugs!

Monday, 1 November 2010

Rejoice Christmas Card with Cindy Loo


Hello everyone - it is a Bitten by the Bug 2 Monday with our weekly challenge kicking off my week of Christmas themed projects.  As most of you know, there is a "challenge" cut each week at BBTB2 which the Design Team must use in our projects.  This week's challenge cut is Flourish 3 from the Cindy Loo cartridge.  I have incorporated the flourish into my Rejoice Christmas card.


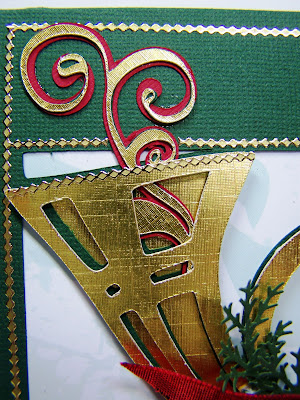
My base card was cut using one of two card options on the Cricut Circle cartridge, French Manor.  Each cut on French Manor has two card features - I chose the full image cut out card and selected this wonderful French Horn.  I created a French Horn base layer and using Cricut Design Studio - utilizing the "Hide Select Contour" option, I removed the inside cuts on the base layer horn.  I attached the base layer behind the green card front.  I also cut a top layer of French Horn, this time with the cut outs included and using pop dots, attached the horn over the green layer.  Between the gold and green layers of the horn you can see this week's challenge cut, Cindy Loo's Flourish 3, coming out of the horn in triple layers.  The flourish represents the music of the French Horn.


While at CHA last summer I purchased quite a few sheets of "peel offs".   I confess that I purchased peel offs in several colors and brought home peels for myself and my scrapping girl friends!!  I framed the front of the card using gold peel offs, both around the outside edges and around the plain green rectangle at the top of the card.  I added the gold peel off title, Rejoice, to the upper right front across from the flourish on the upper left..  Peel offs were also added around the mouth piece of the horn and the bell end of the horn. 


I added a scrap of lovely SEI Christmas paper behind the horn in the cut out area of the card.  I played with several color and a prints until I settled on this light blue and white print. 

The inside of the card has a white cardstock lining with a thin rim of green showing around the edges.  I finished the inside of the card with a strip of gold peel off under the signature area.


The front of the card was finished by trying a pretty silk ribbon around the horn.  I also used my Martha Stewart branch punch and added evergreen branches on either side of the bow knot, growing up the edges of the French Horn.

I really like this card and plan to duplicate it for a couple of friends to use.  I will be back tomorrow with the second of my Christmas week projects.

Popular Posts