Thursday, 30 December 2010

Hot Artichoke Dip Recipe - Gluten-Free + Vegan

Hot artichoke dip that is gluten free and dairy free vegan
This hot artichoke dip is worthy of a party. Gluten-free and vegan yum.

I wasn't sure I had another recipe post in me -- before the year of 2010 turns into a pumpkin and rolls backward into the past. I thought I was going out with a year-end Top Ten Gluten-Free Recipes post, catching up with all you gluten-free  lovelies again in 2011. I thought I was done. Spent. Empty as a pocket, to quote a certain singer-songwriter. So much for assumptions.

Turns out my fevered brain wasn't done with 2010. It spun off in party mode as soon as I heard that my oldest son was officially engaged. He popped the question with true romantic flare. On a wine train. In the rain. In Napa Valley. And she said yes. The ring fit. People on the train applauded. It doesn't get much better than this. To witness your son's heart. Blooming.

Your misty-eyed gluten-free goddess is going to be a mother-in-law.

And so. The year closes. I make a mug of chamomile tea and reflect upon the deepest joys of motherhood, turning their myriad facets toward the window light above the kitchen sink stacked with breakfast plates, cups, and spoons. Learning to love with open arms and a tender opinion, unconditional. This floats to the top of all other joys. The thick cream of it. A layered, rich reward. To love a son expands your heart beyond measure. To see him love, and inspire love, is the most beautiful working of magic. 

Don't you think?


Continue reading

Saturday, 18 December 2010

Home for Christmas with Everyday Cricut


 Oh guess what??  It is that extra special Saturday of the month where Melanie and Joy from Everyday Cricut allow me to be their third Saturday designer!  I like these two women so much and it is such a treat to be part of their team!  This week I have a fun and festive Christmas layout to share - Home for Christmas

All of the details on the layout are available at Everyday Cricut today.  The article discusses how to make the train photo car and flatbed car, in addition to other elements. Also all of the photos at EC enlarge to super size when clicked to give you better views. 

The cut file (using design studio) is available for download right here on my blog.  Locate the file name, Home for Christmas Layout, in the left column of this blog, in the downloadable cut file section. 


 This is one of my all time favorite Christmas layouts and I am pleased to share it will each of you.  I hope that you enjoy the layout and that it look fabulous with your family's Christmas photos!!!!


Tuesday, 23 November 2010

Papertake Weekly - Cut it out!


Happy Tuesday everyone! It's time for a new Papertake Weekly challenge, and this week it's "Cut it Out". So you can use your punches, die cuts, or just cut your image out with your scissors! We're being sponsored this week by the fabulous Wendy over at Digital Delights by Louby Loo! I chose to use this absolutely adorable penguin from Kraftin Kimmie called Oliver! I fell head over heels in love with this little guy as soon as I saw him last year and had to have him. Well it just so happens that Kimmie sent me another Oliver stamp in my Guest Design Team package, so some lucky person out there is getting ready to win him! All you have to do is leave a comment on this post before 11:59pm Friday night, November 26th, and I'll pull a lucky winner sometime next weekend!


Oliver is colored with Copic markers and then cut out and popped up for dimension. The hearts were cut from Nesties and the icicle punched border is from  a Martha Stewart punch. The sentiment is computer generated. I used Bazzill cardstock for the base, Kraft cardstock for matting, and the PP is from Nitwit Collections. The red pearls are Kaiser and the ribbon is May Arts. That's it for me today! Please be sure and pop over to Papertake Weekly to see what the rest of the fabulous designers created for your viewing pleasure. And then grab your paper and glue and join us in the challenge! Thanks for stopping by to see me today, and for those of you that are in the States, I wish you and yours a Very Happy Thanksgiving! Hugs! Don't forget to leave a comment for a chance to win Oliver!

Saturday, 13 November 2010

Embossed Christmas Trees With SP & Co. Stamps


Yeah, it's the weekend!!  I love the weekend - there should be fewer weekdays and more week end days!  Can any of you arrange that?

Last week I posted my first two cards made with Samantha's, SP and Company, Christmas Tree stamp set.  I mentioned that I had stamped the trees on pink textured cardstock and embossed the print.  This is the card I made with those embossed trees.


I used embossing ink and burgundy embossing powder to create these four trees.  Each stamp was loaded with embossing ink, then stamped onto the pink cardstock.  Burgundy embossing powder (from PK Glitz - formerly the Powder Keg) was applied over the ink and heated with a heat embossing gun.   The effect created with the hand mixed embossing powders is a medium thick embossing with touches of sparkle mixed in the color. 

Using micro tipped scissors I cut out each tree and saved them along with a 6 x 6 square of the pink cardstock.  Last weekend I pulled out the set aside elements and created this card.

Using the Spellbinder's Wizard and Nestie Label #1, the label shape was cut out of the middle of the pink cardstock, creating a label shaped void - and a perfect spot to layer and pop the trees!  The pink cardstock was then trimmed to fit on the front of the burgundy card.

Using assorted sized half pearl embellishments and holographic peel offs, the trees were decorated prior to being layered and attached to the card front.  A Season's Greeting peel off sentiment was added to the front of the card along with half pearls in the corners of the pink cardstock.  Finally holographic peel offs were added to frame the front of the card. 


I have enjoyed using the SP and Company stamps and will be making at least one more Christmas card using this set in the next couple of weeks.  I will be back tomorrow and start another week of Thanksgiving themed projects.

Thursday, 4 November 2010

Twas the Night Before Christmas - A new release and challenge


There's a new release over at Digital Delights by Louby Loo today,  along with a new challenge at Delightful Challenges which is Stitching - real or faux.   I used this cute image Christmas Morning Pippin and he's colored with Copic markers. Cardstock is Bazzill, PP is from Nitwits, and the scroll was cut using my Cricut Expression and Christmas Cheer cartridge from Hallmark Scrapbook. That gorgeous ribbon is from Stamp and Create, and that cute mouse charm is from Bunny Zoe's Crafts.


Please be sure and pop over to Delightful Challenges and take a peek at all the fabulous creations by the rest of the design team! Thanks for stopping by to see me today, and hope to see you back again soon. Hugs!

Monday, 1 November 2010

Rejoice Christmas Card with Cindy Loo


Hello everyone - it is a Bitten by the Bug 2 Monday with our weekly challenge kicking off my week of Christmas themed projects.  As most of you know, there is a "challenge" cut each week at BBTB2 which the Design Team must use in our projects.  This week's challenge cut is Flourish 3 from the Cindy Loo cartridge.  I have incorporated the flourish into my Rejoice Christmas card.


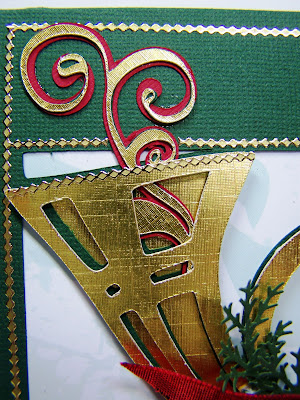
My base card was cut using one of two card options on the Cricut Circle cartridge, French Manor.  Each cut on French Manor has two card features - I chose the full image cut out card and selected this wonderful French Horn.  I created a French Horn base layer and using Cricut Design Studio - utilizing the "Hide Select Contour" option, I removed the inside cuts on the base layer horn.  I attached the base layer behind the green card front.  I also cut a top layer of French Horn, this time with the cut outs included and using pop dots, attached the horn over the green layer.  Between the gold and green layers of the horn you can see this week's challenge cut, Cindy Loo's Flourish 3, coming out of the horn in triple layers.  The flourish represents the music of the French Horn.


While at CHA last summer I purchased quite a few sheets of "peel offs".   I confess that I purchased peel offs in several colors and brought home peels for myself and my scrapping girl friends!!  I framed the front of the card using gold peel offs, both around the outside edges and around the plain green rectangle at the top of the card.  I added the gold peel off title, Rejoice, to the upper right front across from the flourish on the upper left..  Peel offs were also added around the mouth piece of the horn and the bell end of the horn. 


I added a scrap of lovely SEI Christmas paper behind the horn in the cut out area of the card.  I played with several color and a prints until I settled on this light blue and white print. 

The inside of the card has a white cardstock lining with a thin rim of green showing around the edges.  I finished the inside of the card with a strip of gold peel off under the signature area.


The front of the card was finished by trying a pretty silk ribbon around the horn.  I also used my Martha Stewart branch punch and added evergreen branches on either side of the bow knot, growing up the edges of the French Horn.

I really like this card and plan to duplicate it for a couple of friends to use.  I will be back tomorrow with the second of my Christmas week projects.

Friday, 29 October 2010

Spooky Boo Alice Card with Nesties


Only two days left until All Hallows Eve so my week of Halloween themed projects is close to winding up.  Today's card features some of the same elements that I have shared in earlier posts this week, Graphic 45 paper, Prima flowers, fun fall papers, and Halloween ribbons.  Of course the elements are put together differently making a completely new card.  I love that about paper crafting.


The main image of the card is from Graphic 45's Hallowe'en  in Wonderland line.  The image was cut out with a nestabilities, as was the cardstock mat behind the image.  The matting was embossed with a Spellbinder's metal embossing sheet before being affixed behind the top image.  


The base card is black (as is the matching envelope) with wonderful orange and cream print paper added to the front.  Atop the front paper I added an angled rectangle of lighter colored matting to create a bit of contrast between the orange background and the copper image matting.


I trimmed the Hallowe'en in Wonderland card and tucked it under the edge of the image and added a yellow Prima flower that matches the gold color in the image.  I added a row of lace and topped the lace with a fun Halloween "Spooky Boo" ribbon and bow.  A bit of black doodling around the edges of the card added a bit of interest to the edges..  Inside I added a square of smooth white cardstock to hold the Halloween message.


This card is one of my favorites of the season.  I like the simplicity and elegance.   I will be back tomorrow with a new project to share.  This project will be a surprise - for all of us as I have NO idea what I am going to make!!  I will see you tomorrow!

Thursday, 30 September 2010

Delightful Challenges - purple, green, and black color challenge!


Hi everyone! It's almost Friday! YAY! And since it's Thursday, that means it's time for a new challenge from Delightful Challenges!  We are sponsored this week by Kut 4 U.  Our challenge is to use the colors purple, green, and black. I threw a few other colors in there, but for the majority of the card, those are definitely my main colors. I used Frankie Ridley along with the haunted house from the Halloween Accessory Set.

The fence is cut with my Cricut Expression from the Paper Dolls cartridge. I honestly can't remember if it was Everyday or Dress Up. See what happens when you use the Gypsy and don't have to dig out all those cartridges anymore? LOL! Anyway, I curved the fence out from the card, so they're attached to the card on both sides, and then curved out through the center of the fence.  Please be sure to visit Delightful Challenges to see what the rest of my talented DT sisters came up with for this challenge. And don't forget to hop over HERE to see the Digital Delights DT have come up with for today as well. Thanks for stopping by to see me today and hope to see you back again soon! Hugs!

Monday, 20 September 2010

Magnolia-licious Blog hop - Bats and Broomsticks!!!!

Woohoo!!!! It's time for another Manolia-licious blog hop! This month our theme is Bats and Broomsticks! I love Halloween and all the fun it brings. I love draping spider webs and creepy music and tombstones in the yard!! LOL! If you made your way here from the oh-so-talented Janiel, then you're on the right track. If not, then please head back to the Magnolia-licious Highlites blog to start at the beginning.  I don't want you to miss any of the spooktacular delights the design team has cooked up for you in their cauldrons!  I chose to use this adorable #398 Sitting Witch Tilda,  the cutest bat in the history of stamps #479 Bat. The tombston is also a Magnolia stamp from the So Spooky collection, but it appears it's not in stock right now. If you're interested, please just send Diana an email and ask her if she's got some on order. There are tons of fabulous Halloween stamps in stock and available right now over at Magnolia-licious!

Now for the FUN stuff! I'm giving away this cute Sitting Witch Tilda stamp along with the adorable bat stamp to one lucky person that leaves a comment on this post before midnight Friday night, Sept 24th!! One comment per person please, and I'll ship anywhere. Now it's time to make your way over to see the fabulously talented Mindy! Thanks for stopping by to see me today, and hope to see you back again soon! Hugs!

Tuesday, 7 September 2010

Papertake Weekly sketch week!


Hi everyone! Hope you enjoyed your weekend! I love long weekends, don't you? It's back to work today, but for three days only for me this week. On Friday I'll be enjoying myself with a weekend away with hubby over in San Francisco. But today, it's time for a new challenge from Dawny over at Papertake Weekly, and this week it's a sketch challenge! We're being sponsored by the fabulous Katharina at Whiff of Joy.


For my card today, I used this beautiful Magnolia stamp from Magnolia-licious. #301 Tilda with Umbrella from the Bon Voyage collection. I thought she was perfect for a shower card! She's colored with Copic markers and then cut out and popped up off the card front with dimensional tape. The frame she's on was cut with my Cricut Expression from the Storybook cartridge. There is no shadow feature, but using the Gypsy, I just reduced/enlarged the size twice with that little slider feature and voila, a shadow!


The DP are Basic Grey Porcelain line, and the cardstock is Bazzill.  I created the sentiment with my MS Word program and the flowers are from Wild Orchid Crafts with some added diamond Stickles and a couple branches from a Martha Stewart punch. The panels are all machine stitched , and I added a bow made from May Arts silk ribbon and an umbrella charm. The center border was created using a Martha Stewart border punch.


Please be sure to visit Papertake Weekly to see the rest of the fabulous creations by my awesomely talented design team sisters, then we'd love it if you'd grab your paper and glue and join us in the challenge for a chance to win a fabulous prize from Whiff of Joy! Thanks so much for stopping by to see me today and hope to see you back again soon! Hugs!

Wednesday, 18 August 2010

Welcome to day one of sneak peeks for the new Wags 'n Whiskers release!


I'm so excited! Today is day one of the sneak peeks for the new Wags 'n Whiskers release! And believe me, they're really fairy cute!  For today's sneak peek, I chose to work with this adorable young fairy called Hannah! She's colored with Copic markers and cut out and popped up for dimension. I just had to give her pink hair! LOL!


Cardstock is Bazzill, and DP are by MME. I also used May Arts silk ribbon and Wild Orchid Crafts flowers. The frame Hannah is sitting on is cut with my Cricut and Just Because Cards cartridge. You'll also see some Kaiser flat backed pearls scattered around the card as well.

Please visit the rest of the Divas to see their fabulous creations with the new stamps!  And don't forget to go to the Wags 'n Whiskers challenge blog and sign up for the Spread The Word contest for a chance to win the entire new collection!


Thanks so much for stopping by to see me today, and hope to see you back tomorrow for day two of the sneak peeks! Hugs!

Sunday, 15 August 2010

Cupcakes and Baking and Why You Need an Oven Thermometer

Before you bake these cupcakes, get an oven thermometer.

I attempted my first baking recipe yesterday. In the new apartment, that is. The kitchen is new, not the baker. I've been around the block a time or two when it comes to batter and dough (so if you're new to the blog, Darling, don't panic- I've got armloads of gluten-free recipes waiting for your brilliance to coax them to life). See that sparkling little cupcake gem above? Try it's zesty orangeness on for size. Because the recipe I was developing for you... Well. 

It failed. 

What was it? you idly wonder. Zucchini bread. A bread that should have been moist and tender and bursting with juicy bits of zucchini. A perennial August favorite I haven't sunk my teeth into since going gluten-free nine years ago. So I was due.

What happened?

Here's the thing. The thing I have to share with you that could change your gluten-free baking life. The back story: the stove is new. As in brand spanking new. No gluten has ever darkened it's white enamel door (a psychological plus). And it's a gas stove (heats quickly, super efficient). So what I am about to tell you may surprise you.

The oven temperature was off. As in way off.

How do I know? I had an inkling. I bought an oven thermometer. I installed it. And I set the oven temperature to 350 degrees F. When the preheat light went off I opened the oven door. It read 400 cussing degrees.


Continue reading

Saturday, 31 July 2010

CHA - Trade Show Day 3 & Super Show Day 1


Thursday was the last day of the trade show and I spent a lot of time going around and picking up flyers and order forms from various companies on behalf of Custom Crops. I found a new line of paper called Lillie Bee  that I really liked, the new e-craft machine (the new die cut machine that does not use mats), the Spellbinder's new really big cutting & embossing machine, and peel-offs - awesome gold and silver card or page embellishing strips.  There were so many amazing products.  I found some "must have" tools and the papers - OMGosh!  The papers were so pretty, so varied, and so amazing.  And the papers were used in such creative ways, like this "store" with it's paper flowers.

I love this Christmas banner - the glitter and elegance of the design.


The trade show ended at 3:00 pm and then it was time to set up the booth for the Super Show.  The staff at Custom Crops did a super job of setting up the booth - it is open but has lots of product.  It has the most unique and fabulous paper, wood, and tag tree.  I just love it.  It is truly a work of art and I would love to take it home.  I suspect the airline would not be as excited about the trees.

One of the elements of the "Centers" theme booth layout (or stations if you prefer - DVD Stations, Demonstrations, Pink Stamper, Retail lines, and make and take area) that I particularly like is the Framed Photo area.  There is a Custom Crops contest for those who use the frame and post photos to the Iternet.  Below the uber-talented Amy Chomas and I are goofing in the photo booth while we were trying to get it into position.


Thursday night included dinner out with part of the Custom Crops group; I just hated that Maria couldn't be there because she is so nice. Kelly took us out for authentic Chicago pizza and it was FABULOUS!

( Maria McGuire, Me, Donna Mundinger, Diane Campbell Payne [Capadia], and Melanie Brown.)

Friday morning I had a two special treats - I attended the Cricut Circle gathering.  It was really nice to see so many Circle folks present.  Mike from Provo Craft spoke for quite some time attempting to dispell rumors and such.  I have enjoyed getting to know him this week.  He is such a nice guy.

(Me, Joy Tracey, Diane Campbell Payne and Melanie Brown circling.  I loved spending time with these three women.  Diane was my roommate and Melanie & Joy are just fabulous!)

We had a special guest at the circle gathering and he was so amusing:  The Cricut!  The photo below was taken on the floor of the show but he was so cute I decided to use this photo instead of one from the gathering.


My second treat on Friday morning was my friend Peggy from home was in Chicago for a few days and she was able to join me at CHA for a few hours of shopping and make & takes!  It was so nice to be with a good friend and she had fun seeing the new products and viewing all of the booths.  As a HUGE bonus, Peggy took two large shopping bags full of products home so that my luggage will not go over weight and my carry-on will not dislocate my shoulder.  While Peggy was here, of course I HAD to photograph her with the Cricut!  You cannot come to CHA and miss the Cricut!


We also had to visit the Custom Crops photo booth!


I purchased a two of these AWESOME stamps, but I wanted to purchase more! 


After Peggy left, I helped out in the Custom Crops booth.  The CC booth was one uber-busy place!  Each of the five areas was constantly packed.  It was awesome.  The next few photos are from the booth:


And now I am off to day two of the Super Show and then tonight I fly home.  If all goes well I will be in my own bed tonight!!!

Tuesday, 27 July 2010

Stamp and Create new Product Spotlight - Sweet November Stamps


Happy hump day! We're halfway to the weekend! There's a new product spotlight over at Stamp and Create this week, and it's the Sweet November stamps! All Sweet November stamps are on sale for 25% off through Sunday, August 1st! These stamps are so much fun! I chose to use the image Darby and Skip.  


They're colored with Copic markers and Skip is cut out and popped up from the card with dimensional tape. The bow is made with May Arts silk ribbon along with the Bow Easy. For the sentiment, I added one of Tim Holtz word sticks that says "time" with a ticket that was stamped with a ticket stamp set by Autumn Leaves, and then I ran the ticket through my computer for the "4 fun" sentiment.  Right along the top of the horizontal panel, I added a string of  Kaiser pearls.


Card base and matting cardstock is Bazzil, and the DP is from a stack I have. The punched corners on the image mat and horizontal mat are punched with a Martha Stewart punch around the page set. Of course I had to add one lonely little flower as an accent. LOL! I hope you enjoyed my card today, and please be sure and visit Stamp and Create to take advantage of the sale!! And pop over to the Stamp and Create Blog to check out the amazing creations presented by the design team. And don't forget to participate in the chllenge while you're there!  This is my last card as a guest designer for Lacey's store, so I want to send out a special thank you to her and to the fabulous ladies on her design team. They're all amazing artists and wonderful people! I have truly enjoyed my stay. Thanks so much for stopping by to see me today, and hope to see you back again soon! Hugs!

Popular Posts